Start Slowly
It doesn’t take much to get started. Over time as your interest grows so too can the bench clutter. Start with the basics.
Signal Tracer
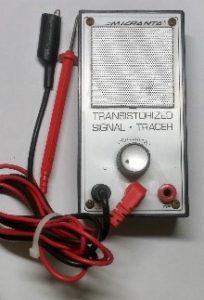
Minimally you will need a signal tracing instrument such as the Micronata unit shown here. They typically sell for between $15.00 and $50.00 on eBay. Be sure you get one that is tested and works, or be prepared to troubleshoot it before you troubleshoot with it.
Tracers are simply a battery-operated transistorized amplifiers with speakers, volume controls and test probes. The one shown here has three jacks marks COM, AF and RF.
You would connect the COM to the ground (Common) circuitry in the set being examined. The AF input lets you track down audio signals or the lack thereof. The RF jack sends probe signals through a diode on their way to the amplifier, enabling you to detect radio signals in parts of the set prior to where they become audio.
If the probes are missing you can easily buy or build replacements. These tracers are getting old enough so that you might consider replacing the electrolytic capacitors within. It’s easy to do.
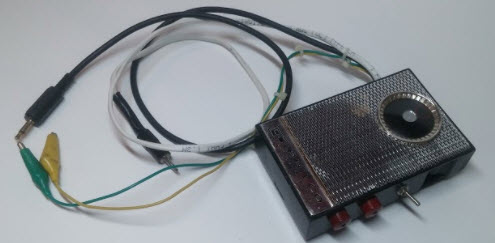
Signal Injector/Tracer
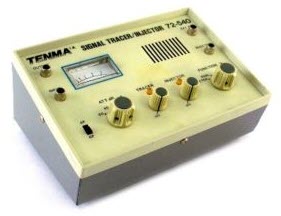 I own a Micronata signal tracer, but normally use a device like this one. It’s a little fancier. The Tenma 72-540 is a combination signal injector and tracer, and it has a meter so that you can see the effects of your work.
They pop up on eBay from time-to-time for under $100.00. These often come without test leads, which you will then need to either buy or build. As you will see in the DIY section of the website, I changed the connectors on mine to accommodate better leads.
Multimeter
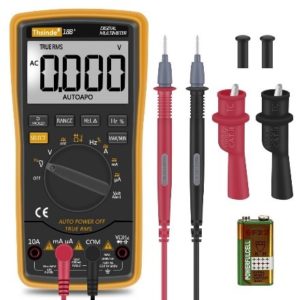
You will also want to own a good multimeter capable of measuring at least AC and DC Volts, and Resistance (Ohms). There are plenty of other features found in multimeters these days, some of them helpful, others not so much.
This is not a good place to skimp. There are plenty of meters selling for under $10.00. I would avoid them all. If you have the budget for a name brand such as Fluke it will probably be money well-spent. There are counterfeit Flukes circulating now, so do your research and be suspicious of incredible bargains.
But if you prefer not to spend $100.00 or more, consider the TH036 and similar devices sold by Amazon. Many have an impressive list of features, and routinely receives glowing reviews from users.
A Known Good Radio
As odd as it sounds, a working radio is a handy thing to have on the bench. Do you remember reading about oscillators Back in early chapters? Oscillators do fail occasionally, and you can use an expensive, bulky frequency counter or oscilloscope to track down the oscillator signal or its absence. A little pocket radio can do pretty much the same thing. You can how here.
If you fool around with in-home broadcast transmitters, consider putting a digital radio on your bench, preferably one that measures and displays signal strength as well.
What? That’s All?
Yup. This should get you rolling:
- Some hand tools
- A can of contact cleaner
- A soldering iron
- An Injector/Tracer
- A Multimeter
- A worklight
- Perhaps a magnifier
- And a working radio
If, however, you want to grow your pile of stuff, there are plenty of ways to do that. Some of these things you can even make yourself.
Test Cables
 A variety of cords with alligator and mini clips will come in handy for sure. It’s nice to have a few of these cables with full-size alligator clips on one end and mini-grabbers on the other. Buy or make these. (The store-bought imported ones are often flimsy.)
It's also handy to have piercing probes. These sharp-pointed devices let you get to the wire beneath insulation so that you can take measurements when it would be otherwise difficult or impossible to reach either end of the wire. Old circuit board traces are often covered with protective coatings or crud. Pointed probes will cut through this.
Speaker Substitution Box
It is also useful to have a small, external speaker in an enclosure with a variety of ways to connect it.
 I built this one using an old Philco radio case and speaker. It has three ways to connect radios to the test speaker—a standard earphone plug, a mini earphone plug and alligator clips. This combination can help you troubleshoot radio speakers even before you open the case.
See how to build your own in the Homebrew DIY section of this website.
Those test plugs on the side of the case let me connect a voltmeter to the output of the radio. This is useful when performing alignments. That toggle switch disconnects the test speaker and substitutes an 8Ω resistor so that no one needs to listen to the radio noises while aligning.
Advanced Test Equipment
Collectible Vs. Contemporary Test Gear
I have said this elsewhere on the site, but it is worth repeating here. There are two reasons to own collectible, vintage test gear. The first is to use it while restoring vintage radios, televisions, HAM rigs and so on.
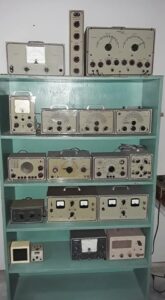 The second reason is simply to have a nice collection of vintage test equipment. There is nothing wrong with trying to own every signal generator Heathkit offered, although it would take a lot of room, and probably cost you a bundle. The photo on the right is part of Jim Nichols' collection of early Heathkit gear, much of it test equipment.
So, heck, if you enjoy vintage test equipment collect away. There are even entire books devoted to vintage test equipment. Tube Testers and Classic Test Gear by Alan Douglas is an example.
But should You Use It?
I think there’s a middle ground. Some of us own vintage, or near-vintage gear that we use in our everyday repair tasks. This, I suppose, is the electronic equivalent of what car collectors call “driver cars.”
In this regard, my preference is for the solid state test gear made in the late sixties and early seventies. It works well, has no tubes to burn out, needs less recalibration and adjustment and, to strain an earlier analogy, it still has plenty of miles left on it.
Things That Make Restoration Easier & More Fun
Here are some things I have on my bench that I find very helpful. They speed up the repair process as well.
Battery Testers
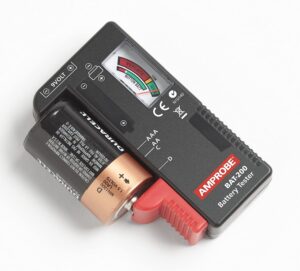 You can measure battery voltages with any voltmeter, but batteries perform differently under load. So a simple battery tester is a worthwhile investment. It will give you a more accurate sense of a battery's health.
This one has a color-coded display with "Good", "Low" and "Replace/Recharge" indicators. It
test both standard and rechargeable batteries, be they 9V, AA, AAA, C, D, or 1.5V button cells. It costs less than a big Starbucks.
Bench Power Supplies
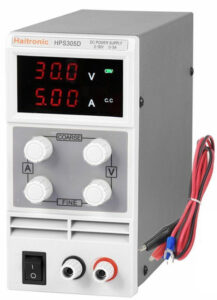 A decent, well-regulated DC power supply can be a godsent. There are plenty of choices. At a minimum you should get one that has both course and fine voltage adjustments. Many have built in Ammeters. Some include current limiting features that will shut off the power if too much current is drawn--from a short circuit or bad electrolytic, for example. This feature can minimize the magic smoke most techs have experienced a time or two.
I am using Haltronic HPS305D like the one shown here. These are affordable, and available everywhere. It supplies 0-5VDC at up to 5A. If you work on DC powered devices that draw a lot of current, such as vintage car radios, you will want something that can provide more power. And, if you work on old portable tube radios you might want to find something that can provide up to 100VDC or more. (This will likely be a second power supply to supplement your low voltage supply.) In any event, there is no shortage of good, affordable power supplies in the wild. It's not difficult to build your own tho, and there are plenty of plans online.
Bench Power Supply Quick Change Cables
The methods of connecting battery power to portable radios seem endless. When using a bench supply, the kneejerk choice is to use alligator clips. Using alligator clips can be frustrating, and might even cause damage if they move around too much or at the wrong time. I've made several adapters to minimize this issue. You can too. Check out the Homebrew DIY section to see them.
Signal Injectors
 Signal injectors are the equivalent of fire hoses. They spew out RF and audio signals across a wide spectrum. If you touch the output lead of a signal injector to a working radio's antenna lead you will hear a tone from the radio's speaker. Poke the IF inputs? Same thing. The center post on your radio's volume control should produce a comforting squeal as well. It's often possible to trace down defective stages using an injector alone.
They were commonplace in the sixties, but are now difficult to find. You can, however, build one using the circuit shown here. There are more details and packaging suggestions in the Homebrew DIY section. I am working on a kit version of this with a PCB, so if you don't breadboard your own, stay tuned.
RF Signal Generators
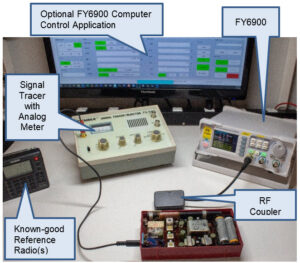 A stable, calibrated RF signal generator is a must if you plan to quickly align and calibrate radios. For AM radio work it is very useful to have one that outputs audio modulated RF. Most vintage signal generators do this. Most contemporary ones do not.
I've switched to a FeelElec FY6900 DDS "function" generator that is rock solid and does enable you to modulate the RF. It's shown at the middle-right of the photo here.
I sell complete packages including an FY6900, a specialize RF coupler and step-by-step instructions in my eBay store. If you already have your own FY6900 and need a coupler or my instructions, they are also available in my eBay store. You can also purchase a downloadable version of the instructions HERE. The PDF booklet is called AM RADIO ALIGNMENT Using the FY9600 - The Missing Manual.
Oscilloscopes
If you repair HiFi gear, transmitters, vintage computers and such, an oscilloscope can be handy to have. Again, there are plenty of amazing low cost imports available and a ton of surplus Tektronix and other boat anchors waiting to take a ride on a UPS truck. Just be sure that any old scope that you buy has been fully tested and calibrated, and/or that you have the equipment and skills to keep it accurate.
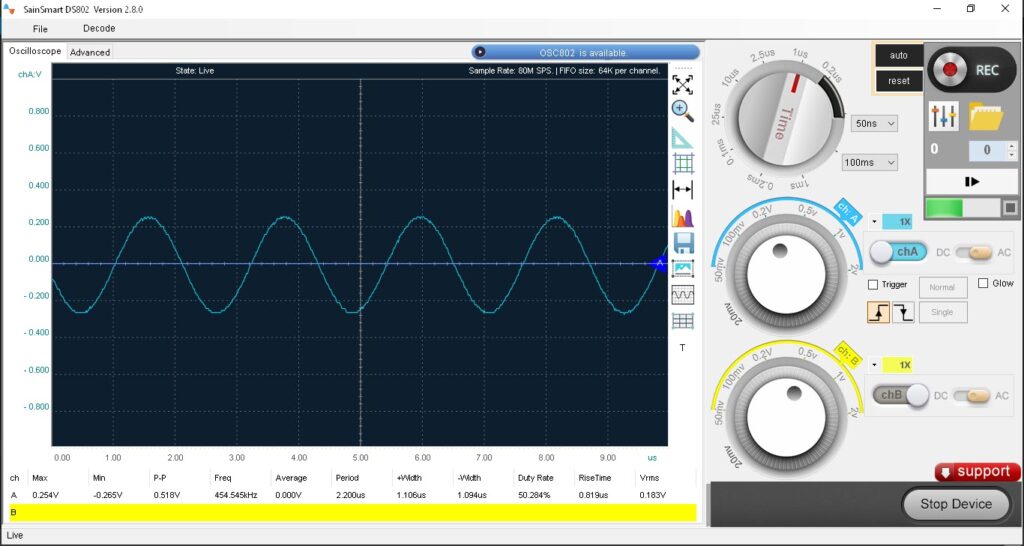
After owning, and selling-off numerous vintage scopes, I have settled on something contemporary. It's a 25MHz SainSmart DS802 Dual Channel Virtual PC Oscilloscope. It connects to my Windows laptop and has an on-screen display that simulates a typical scope faceplate. This is a Windows only product, but there are alternatives for Mac users as well. Be sure you read some reviews, and/or have generous return privileges if you go this route. I think that this is awesome, space and time saving technology.
Frequency Counters
 A digital frequency counter can be very useful if you use analog signal generators. There a a ton of affordable, solid state used ones for sale on eBay. There are numerous impots available as well.
My preference is to use the frequency counter built into my laptop-based oscilloscope described above.
Analog Voltmeters
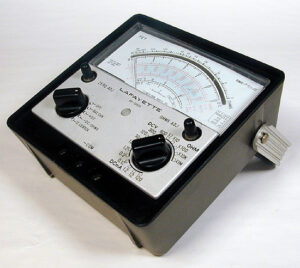 Any workbench, and most kitchen junk drawers and garages have at least one digital voltmeter (DVM) living there. However, if you do radio alignments, you might find an analog voltmeter with a big face a very useful bench addition.
Most digital meters are slow to update, and will not accurately track the tiny movements you make when adjusting IF transformers and such.
If all you do is use an analog meter to watch alignment progress, you won't need to worry about the meter's accuracy, so an old tube beast or early transistorized one can be fun and totally useable.
I think that in any case you still need an accurate digital voltmeter for measuring voltages, resistance and current. In the world of transistor radio repair, tenths-of-volts sometimes matter.
Transistor Testers
Vintage components aren't getting any younger, but then, neither are we. I seem to be reading more and more about people finding and replacing defective transistors these days. I've not found that to be true here. I wonder if it's a fad or an unfolding trend?
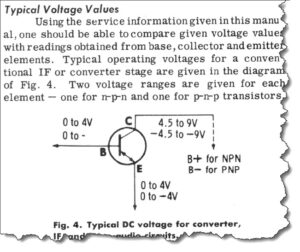 At any rate, I like to be absolutely sure that a transistor is likely defective before unsoldering it. This can usually be done by carefully measuring the voltages going into and coming out of them, once you know what they should be for a particular design.
Sams published an excellent How-to series about this and numerous other servicing techniques spread over the first ten Transistor Service Manual (TSM) books. The series was titled Sams PhotoFacts Techniques in Servicing Transistor Circuits. I go into more detail about these publications elsewhere on the site, but here's a snippet, to give an idea of how helpful the articles can be.
I've scanned, combined, and made them available for free HERE. So, before you pull that next suspect transistor, flip through these wonderful Sams documents. Maybe you'll find the defect elsewhere.
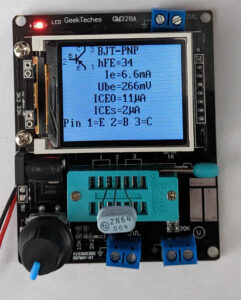 I do have a contemporary transistor tester that I use. It's the ubiquitous GM328. There are variations aplenty of this tester. You can purchase one in kit form or assembled. The instructions that come with them all are, um, disappointing; so-much-so that I have written and published my own documentation.
You can purchase a downloadable copy HERE. I also offer a full-color, printed version in my eBay store.
The GM328 tests other things too, including capacitors, diodes, resistors - I could go on. Buy it as a transistor tester, which is its strong suit.
By the way, the designers claim that it can test transistors in circuit. I have heard these claims before from other transistor tester vendors. I am not a believer.
There are, of course, other transistor testers, both new and used, that you can purchase. Remember that contemporary testers might decide that old transistors as defective, even when they are not, since back in the day semiconductors came from the factory with much higher leakage numbers than today's equivalents. This is particularly true of germanium devices. (Perhaps this is why today's techs think so many vintage transistors are bad? Dunno.)
At any rate be sure you pick up some vintage transistor reference manuals to refer to while testing. You will need to know the design characteristics of devices you test. I like the big, fat GE books in particular. Plenty to be had on eBay, Amazon and elsewhere.
Transistor Radio Multi-Purpose Testers
![]() Like the Swiss Army Knives of test equipment, these do everything, but not very well. They were sold by B&K, Hickok, Moss and others. Many had (mediocre) bench power supplies, transistor testers, signal tracing circuitry and more.
Like the Swiss Army Knives of test equipment, these do everything, but not very well. They were sold by B&K, Hickok, Moss and others. Many had (mediocre) bench power supplies, transistor testers, signal tracing circuitry and more.
The key selling point was size. They are very compact solutions to repair work. That's why they were popular when techs made house calls. Wha?
I used one when I lived in that 24-foot Airstream I mentioned elsewhere, then sent it packing when I moved into a full size workshop.
LCR ( Inductance, Capacitance and Resistance) Meter
Mostly we replace old capacitors now, and a DVM can tell you if a coil is open or a resistor has been toasted, but sometimes it's nice to see if parts are really are defective or not.
 Yet again, Asia has come up with some remarkably innovative, affordable, useful products. This Roster LCR Meter LCR Multimeter costs a little over thirty-bucks, is pocket-sized, and measures inductance (L): 200uH-20H, with an accuracy of up to ± 2.5% (μH=10-6H; mH=10-3H); Resistance (R): 200Ω-20MΩ, accuracy up to: ±0.8%; Capacitance (C): 200pF-2000uF, accuracy up to: ± 2.5% (PF=10-12F;nF=10-9F;μF=10-6F;mF=10-3F); with a claimed accuracy of ±(0.5%+5d).
'Worth a look, particularly if you spend a lot of time around tuned circuits, or build homebrew receivers or transmitters.
Variac or Current Limiting Bulb.
If you work at all with vintage tube electronics, you need a way to slowly bring up the power when you first turn on things that have been sitting, unused for years. This minimizes the chances of a dried out electrolytic or thee smoldering, or even bursting into flames. Read more about that subject HERE.
Lab Reference Standards

Once the toys of the only the rich and aerospace labs, reference standards are now affordable, and surprisingly useful. Even solid state test equipment should be evaluated from time-to-time to ensure its accuracy. Voltmeters, for example. Particularly vintage voltmeters.
'Turns out that you can get remarkably accurate, rock solid reference voltage-producing devices like this one for under twenty bucks. Feed your voltmeters with this and confirm their accuracy or calibrate them.
What Do You Think?
Do you have tips and experiences to share? Questions? Suggested corrections or additions? Leave a comment below. I’ll review comments and post or incorporate the most useful ones. Your email address is required if you choose to comment, but it will not be shared.
Be the first to comment