For Better or Worse
The condition and appearance of the plastic uses in most collectible transistor radios greatly affects any set’s value and appeal. While some materials are quite sturdy and robust, most radios used thin, fragile, easily damaged materials. Cracks and chips are the battle scars of radios that have been used and loved. Dropped at ball games. Improperly pried open when the battery died. Crushed by the movers. Some say these issues are part of the patina. Others like to see sets as they were brand new, or as close to that as possible. Again, I think that truly rare sets should be left unmolested.
First and foremost, if you plan to hide cracks, or replace missing chunks of plastic, you first need to know which plastic material you are repairing.
Types of Plastic
A wide variety of materials were employed. Not all repair techniques work on every material. Here are some of the materials used:
Acrylic
Poly(methyl methacrylate) (PMMA), also known as acrylic or acrylic glass as well as by the trade names Plexiglas, Acrylite, Lucite, and Perspex among several others is a transparent thermoplastic often used in sheet form as a lightweight or shatter-resistant alternative to glass.
Bakelite and Catalin
These materials was first seen in the early 1900s and were not in general use before transistor sets appeared in the fifties. They were used widely in tube sets. Bakelite and Catalin are not synonyms. Bakelite only comes in dark colors, and was not sold past about 1927.
Celluloid
Celluloids are a class of compounds created from nitrocellulose and camphor, with added dyes and other agents. Generally considered the first thermoplastic, it was first created as Parkesine in 1856 and as Xylonite in 1869, before being registered as Celluloid in 1870.
Casein
Casein was widely used in fountain pens and jewelry, and is easy to polish. If you run hot water over it for a few seconds you will smell like burnt milk.
Lucite
Transparent in its natural state, it can also be dyed various colors and made to be opaque.
Polyethylene
This was a popular material, used frequently in transistor radios and in model plane kits. In the late fifties, high impact styrene became available. It was less brittle and was used in many transistor sets.
Polystyrene (PS)
Often found in low cost sets, this is brittle, glossy stuff, prone to hairline cracks. Can be made clear, so sometimes used in dial areas.
Polypropylene (PP)
is a thermoplastic polymer used in a wide variety of applications including packaging and labeling, textiles (e.g., ropes, thermal underwear and carpets), stationery, plastic parts and reusable containers of various types, laboratory equipment, loudspeakers, automotive ...
Nylon
This material also called Polyamide, started out as a synthetic fiber, used in clothing. Eventually it was blended with stiffening materials and found its way into such sets as the Zenith ? and ?.
Polycarbonate
Polycarbonate, or specifically polycarbonate of bisphenol A, is a clear plastic used to make shatterproof windows, lightweight eyeglass lenses, and such. General Electric makes this stuff and sells it as Lexan. Polycarbonate gets its name from the carbonate groups in its backbone chain.
Identifying Plastic Materials
I am certainly not an expert in plastic identification and often resort to testing repair products on parts sets or in out of the way places on the set I am attempting to repair. HERE is a helpful article on vintage plastics. If you have tips and tricks, please share them below.
 Repairing Cracks with Plastruct
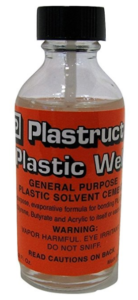
 Plastruct Plastic Weld (shown here) is used to repair hairline cracks in plastic radios. It bonds ABS, Butyrate, Styrene, Acrylic and more. Buy it on Amazon, local hobby shops or eBay.
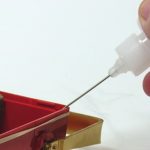
I like to use it in a pin oiler (aka gun oiler) bottle to precisely deliver small amounts of the Plastruct to cracks. You can find these on Amazon, and for less money on eBay and elsewhere.
You should not use the pin oiler for storing quantities of the Plastruct since it will evaporate quickly through the sides of the oiler bottle.
Instead, just suck enough of the Plastruct into the oiler to repair the crack and leave the rest of the solvent in the glass eyedropper bottle.
There are eight easy steps for repairing most cracks:
1. Clean and dry the inside of the crack itself. You want to remove all the dirt and grime. Anything left behind will become permanently imbedded in the plastic, and will show. Consider using a shirt pin or toothpick to pry open the crack carefully so that you can get your toothbrush and cleaning solution into the crack. Here too an ultrasonic cleaner can be helpful.
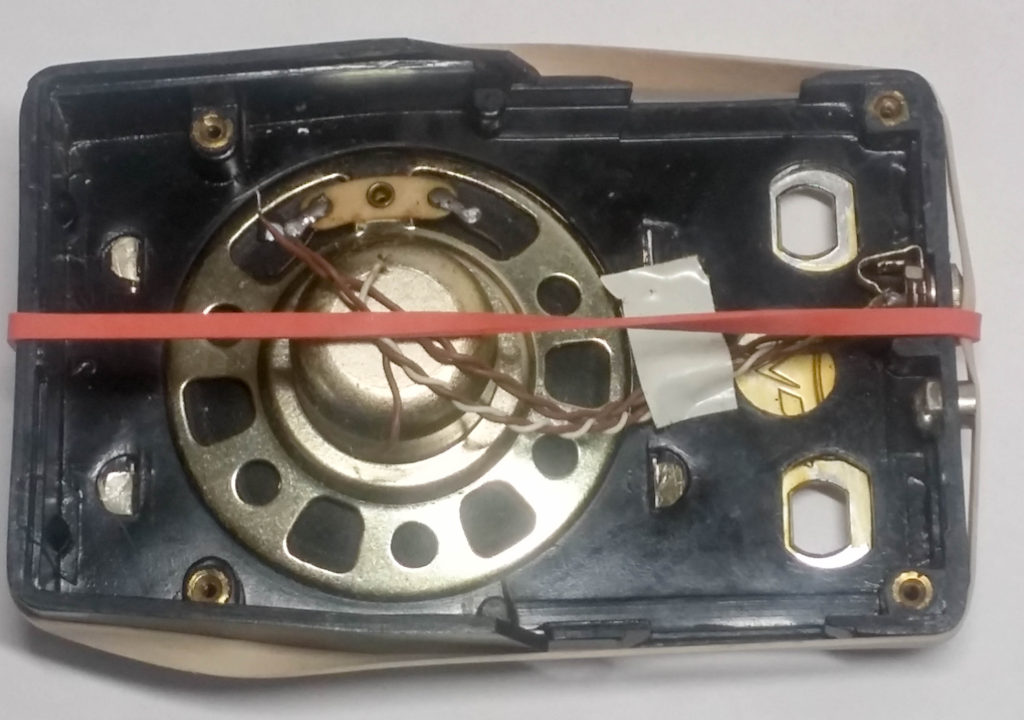
2. Have a rubber band ready that will be used to hold the radio tightly together while the crack cures. Test the size beforehand.
3. Make sure the plastic is completely dry. Pry open the crack carefully and perhaps insert a pin or toothpick to temporarily hold it open.
4. Using the pin oiler squirt a very small amount of the solvent into the crack, and then remove the pin or toothpick and work the sides of the crack against each other to create capillary action which will move the solvent into the entire crack.
5. Place the rubber band around the radio and assure that the crack is properly aligned and tight. Keep the rubber band out of the drying liquid.
6. Let the radio sit at least overnight.
7. Sand lightly with MicroMesh pads to remove any excess solvent from the surface of the repair.
8.Finish by polishing with Brasso, since sometimes Novus solutions can discolor the materials used for crack repair.
Plas-T-Pair for Serious Breaks
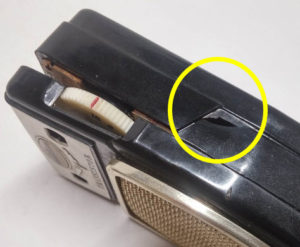
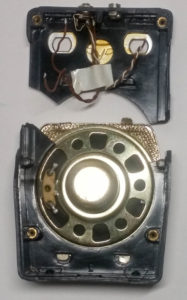 For more serious case breaks you will need a product that will add mass to the area around the damage. The illustration shows a radio with the entire top half of the case front broken away from the bottom. It also has a missing piece on the side. Ouch.
This is an inexpensive Boy's radio with very inexpensive plastic. You might need to experiment to find the correct solvents and adhesives to work on some of these mystery sets. In this case, since the break can be repaired from the inside either Plast-T-Pair or a hot glue gun works. This provides more strength and rigidity than Plastruct Plastic Weld.
- Clean the plastic around the break.
- Mix a small batch of Plast-T-Pair to the consistency of bread dough. Add powder or solvent as needed.
- Secure the parts with rubber bands as shown in Let the repair cure at least 24-hours.
- Replacing Missing Plastic.
- Slather the Plas-T-Pair over the crack(s) and along the cracks.
- Smooth the plastic. Don’t pile it so thick that you will have trouble getting the electronics to fit back into the case.
- Let the repair cure at least 24-hours.
Replacing Missing Plastic
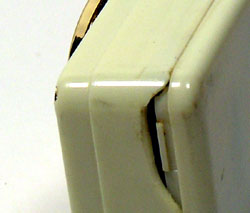 Because the plastic found in vintage radios was often brittle to begin with, and is becoming more so over time, many sets have gaping holes in their plastic. These occur when a set is dropped, or even when someone gets over-zealous when trying to open them. This poor old white radio is a typical example.
While there are several moldable replacement plastic product options, fixing case issues like this can be challenging—even insurmountable. A few of the problems include:
- The variety of plastic types (materials) used over the years.
- Recreating compound curves like the corner shown on the white radio.
- Complex edge and internal details such as the notch required to receive the tab, also seen on that white radio.
- Matching the color of the original plastic with the new.
- Matching the surface finish details.
- Disguising the line where the new and old plastic meet.
- The very likely possibility that you will do more harm to the appearance than good.
Do You Still Have the Broken Piece?
Obviously, if you have the complete broken piece you might be able to glue it back using the crack repair products and techniques discussed earlier. But if you are missing any of the plastic you will need to make a replacement chunk.
Making Replacement Plastic Pieces
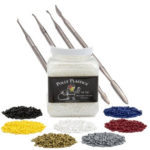 Products such as Polly Plastics pellets (www.pollyplastics.com), available from Amazon and elsewhere, melt in warm water, are malleable for about ten-minutes and then dry as hard as the radio’s case. You can mix colors that can potentially match your set’s case by mixing in the right combination of colored pellets. The hardened plastic can be filed, sanded and polished.
Polly makes a nice starter kit that you can buy on Amazon for under twenty dollars. You might also be able to find this at enlightened local hobby stores.
Modeling putty can be used to form molds if you need them—to recreate corners and othe complex shapes/
You might want some dental tools as well to help shape the plastic before it hardens.
HERE AGAIN, IF YOU ARE JUST GETTING STARTED, PRACTICE ON AN OLD “PARTS” RADIO THAT YOU WON’T MIND DAMAGING.
A Chunk Replacement Example
 This is a work-in-progress as I write this, so I'll come back later and add more photos. Check out that missing piece from our old Bay's Radio. For projects this complex you might need to make a mold first. Polly Plastics sells molding material you can use fashion any necessary molds for corners and such. You will learn more about molds in a moment. Here is an overview of the general chip repair steps, which obviously will need to be modified to match your project’s realities:
- Remove the electronics carefully and set them aside. (In this example, I then fixed the cracks first.)
- Clean and polish the radio entirely so you will know the color you’ll need to match.
- Create dams from mold material to form flat surfaces if this will help shape the repair plastic.
- Melt the pellets in water heated to 150° F (66° C) in a stove pan or microwave. High wattage coffee mug heaters work as well.
- Add pellets to the water and gather them into a blob.
- If you can’t find pellets that match your radio’s color, mix a batch using the various color pellets and the mixing chart as a guide.
- Make a small test blob and let it dry completely to see if the color matches. Keep careful notes detailing the number of the various pellets you use as you work.
- Finally, melt enough plastic for the missing piece.
- Working quickly and carefully with dental or molding tools, fill in the hole, carving out any little ledges or tabs you need—in order to mate front and back parts, for instance. See [Need Pix].
- You can reheat the repair material while it’s on the radio if necessary. Be careful to not melt the original radio case plastic in the process. A hair drier or shrink-wrap heater will work.
- Let the plastic harden completely, perhaps overnight.
- File, sand and polish the repair.
- Admire your work.
Polly Plastics: Tips and Techniques
- Work slowly and thoughtfully. It’s hard to undo some mistakes.
- Don’t use boiling water. Check the water temperature with a thermometer. It needs to be around 150F.
-
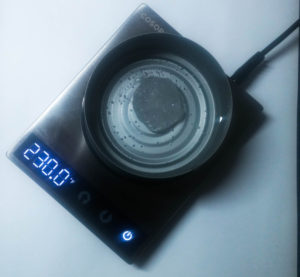
Melting plastic pellets. I use a 24-Watt COSORI coffee cup heater and a clean tuna can and lid to heat up and maintain the water temperature.
- The digital display shows the heater's surface temperature not the water temperature.
- Cover the water when you are not retrieving or adding plastic.
- Pellets are ready when they start to clump together in the hot water.
- Use tongs to remove the plastic from the water, shaking off any excess water.
- Wear gloves.
- Molten plastic can stick to fabrics, metal, fingernail polish and many other plastics including PVC, polystyrene, PET and ABS.
- Parchment paper makes a great work surface.\
- Don’t forget to make tabs and the indents they fit into when repairing sides and backs.
- Use good areas of the case as a guide to make molds for the broken areas. For example, if a corner is missing, press the molding material onto a different corner of the radio to make a mold, as seen in [Need pix].
Silicon Mold Putty: Tips and Techniques
- Keep the materials away from children.
- Wear gloves when molding.
- Work in a well-ventilated room or outdoors.
- Keep the silicon mold material away from your eyes.
- Flush with water for at least 15 minutes if there is contact.
- Avoid prolonged skin contact.
- Don’t ingest mold material.
- Consider getting medical attention if you are seriously contaminated. Take the bottles with you.
- Gather equal parts of the A and B material without cross-contaminating the supply. (Wash your gloves when moving from the Part A container to the Part B container, or use separate spoons, etc.)
- Kneed the two ingredients until the color is uniform and streak-free. Make a ball.
- Quickly work the material into area to be duplicated—an intact corner, for example.
- The plastic will become unworkable in as little as four minutes.
- Let it dry for about 30 minutes, then remove the mold.
- Use it to form the replacement Polly Plastic.
What Do You Think?
help us better-document the plastics used in various radios. Do you have tips and experiences to share? Questions? Suggested corrections or additions? Leave a comment below. I’ll review comments and post or incorporate the most useful ones. Your email address is required if you choose to comment, but it will not be shared.
The repair is great but being retired automotive body repair & refinishing certified in I-CAR Plastic Repair, I sudjest useing the LACEing method. Where useing the small DREMEL (or equivent) the tool must be with accories. first, use the Dremel, to grind the dammage on A angle, then use miniture drill part to make holes. Being carefull to drill inside the beveld area. Cleane-up the spot makeing shure the holes are open. Support with backing brace with tape and use your favorite repair naterial. I use the 5 sec. epoxy repair with the blue light (included) make shure that you ooze the material. By this technique you lace the now cured repair to more than suport the repair. Sand to shape and style the material. Use again if meeded.