Soldering
Proper soldering and unsoldering are key skills if you plan to make electronic repairs. Here's how it's done. The process is both easy to learn, and fun. Do remember to work safely.
Tips and Cautions
-
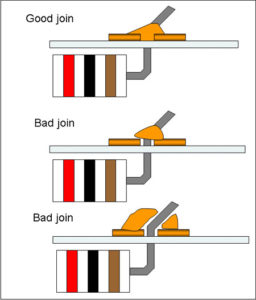
The good, bad and ugly. Always use 60/40 rosin core solder. Never use acid core solder.
- Use a low wattage adjustable 1-50 Watt iron with a small tip designed for printed circuit boards.
- Use a higher wattage iron or gun for large connections on older "hand-wired" sets.
- Clean both soldering and desoldering tips with a moist sponge and then tin them by melting a little solder onto the tips. This preserves the tips and makes it easier to transfer heat from the iron or sucker to the PCB.
- Solder needs to flow between the wire and the printed circuit board copper, so you need to simultaneously heat the wire and the circuit board pad momentarily, (typically three-seconds or less), before applying solder.
- Too much heat can damage the board and/or the component. Too little heat can cause a faulty, or so-called cold joint.
- Moving the component before the new joint cools can also cause a cold joint.
-
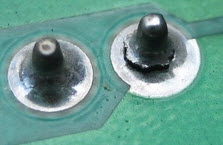
Good (Left) Cold (Right). Good joints look shiny and smooth. Cold joints look dull and rough. When in doubt, reheat.
- Don’t use too much solder or it might flow over to other traces on the circuit board causing a short circuit.
Desoldering Circuit Boards
To remove a component you must heat up all the joints connecting it to the board without damaging anything, and then wiggle the part loose. While it is possible to "wick away" molten solder with a copper braid, desoldering is much easier with the proper tool, or better yet, a sucker-equipped soldering or rework station or a solder sucker.
Removing capacitors is trickier than installing them, and you can easily ruin a radio if you are not careful. Practice on a junker.
- Mark polarities on the board as you remove capacitors.
- Make sure you are working on the right joint! ‘Sounds obvious, but it’s easy to get confused.
- Gently wiggle and pull the capacitor from the component side as you heat the joint.
- Too much heat will damage the foil. Take “cooling” breaks when you encounter stubborn joints.
- Avoid “splattering” solder on the board. If this happens, clean it up immediately.
- If using desoldering wick, cut off the end when it gets clogged.
- The braid gets hot. Watch your fingers, especially as the braid gets shorter.
- Pull the braid away from the circuit board before cooling it. Otherwise you’ll pull you’ll pull up part of the copper trace.
- Use a magnifying glass, especially on small sets to be sure you have cleaned up all the splatters.
Replacing Hand-wired Parts
Hand-wired parts in older sets require slightly different techniques. If the joint is easy to access and only has one or two other components connected there you can simply heat the joint and unwrap the wire of the defective component, then wrap the new wire back on the connecting point and carefully resolder everything.
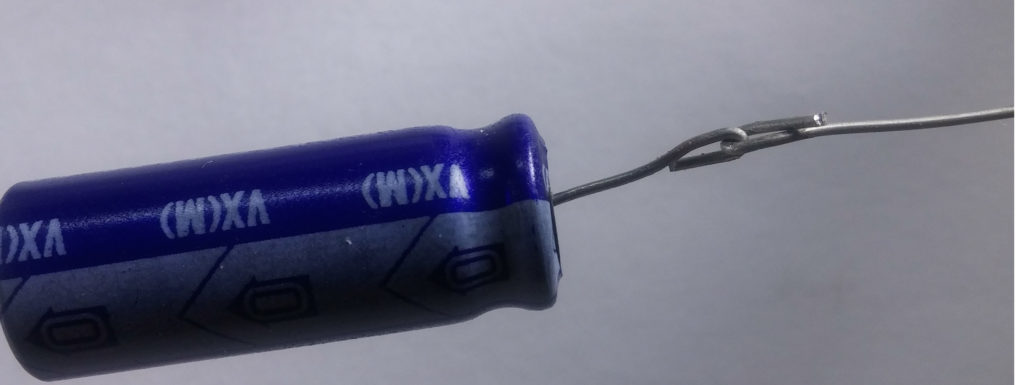
If the joint is hard to reach, or offers other challenges, you might be able to clip the component wire in an accessible area, create a hook on the end of that wire, and mate it with a hook on the new component.
What Do You Think?
Do you have soldering tips and experiences to share? Questions? Suggested corrections or additions? Leave a comment below. I’ll review comments and post or incorporate the most useful ones. Your email address is required if you choose to comment, but it will not be shared.
Is a hot stream of nitrogen capable or suitable for resoldering work?
While that technology is used in industrial settings it’s probably not the right way to go for vintage hobby electronics. Nitrogen is noxious and requires numerous safe handling and use precautions. The required hardware can be pricy as well, so I have never tried it. Has anyone else here?