Even Beginners Can Do These
You don’t need to understand much radio theory or any engineering formulas to do many common AM transistor radio repairs. You might need to do some soldering and desoldering. If you have never done these things, they are fun and easy to learn.
Appendix Two shows you the skills you’ll need. As always, practice on less valuable radios until you feel confident.
Batteries, Holders and Terminals
Battery holders are probably the main enemy of old portable radios. Old batteries were prone to leaking corrosive goo that forms an insulating insulator on the metal parts, preventing contact between the battery and terminals. Dirty or damaged terminals will silence a radio. Learn what to do about that here.
Dirty Volume Controls
 When you move a volume control knob and hear scratchy, static-filled sounds it is likely due to dirty volume control innards.
Sometimes this problem is so bad that you will hear no, or only the scratching noises, making you think that the radio is not receiving signals, and is dead. There’s often an easy fix.
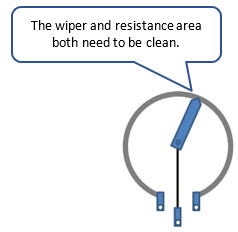
Volume controls are “variable resistors,” which consist of a circular resistive coating (the gray part in the illustration) and a wiper that slides over this material.
Over time dirt and corrosion build up making the connection between the wiper and the coating unreliable.
Sometimes simply moving the volume control rapidly back-and-forth ten or twenty times can clean up the two surfaces.
Contact Cleaner to the Rescue
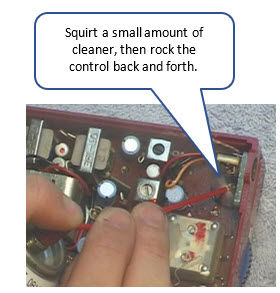
If this fails you should try squirting contact cleaner into the volume control. I like DeoxIT brand spray, but there are many other good ones. You can even use liquid rubbing alcohol in a pinch. Put some of it in a “pin oiler” bottle and apply it that way.
Dirty/faulty Earphone Jacks
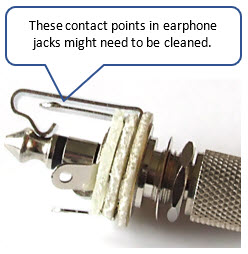
A surprising number of dead radios can be brought back to life by cleaning the small metal contacts in earphone jacks. Take a look at this photo. When the earphone plug is removed both contact points touch, sending the sound to the speaker rather than to the earphones.
When the plug is inserted it disconnects the speaker. For this to work properly the contacts need to be clean. Plugging in an earphone can help you diagnose this problem. If the earphone works, but the speaker doesn’t, then dirty speaker contacts in the jack might be the issue.
 Use the same techniques described for cleaning volume controls and switches. Start by inserting and removing a plug repeatedly. If this fails, resort to contact cleaner. Occasionally, bending the contacts with needle nose pliers might be necessary, but it’s easy to do more harm than good. Bending contacts is a drastic measure.
Some jacks are enclosed in plastic. You might need to replace, rather than repair these. As a last resort, you can wire around the broken connection. This will disable the earphone feature, but sound will play through the speaker.
Dirty/faulty Switches
Switches collect corrosion and dirt over time, especially if a radio has spent lots of time near salt water. If a radio doesn’t play it is very likely that one or more switches will need cleaning.
Again, a squirt or a dribble of contact cleaner might be all that is needed if toggling the switch multiple times does not cure the issue.
Unfortunately, some switches are often difficult to reach for cleaning, and are a nightmare to replace, even if you can find a useable donor part.
Less frequently, power or tone control switches fail as well. For instance, I have seen perhaps a half-dozen Zenith Royal 500H sets with defective power switches.
Sometimes these can be fixed with contact cleaner. Other times you will need to disassemble the switch (risky), or replace it with one from a parts donor.
Radios that cover AM, FM and Shortwave bands typically have band switches used to select the frequency range & electronics necessary to receive the various signal types. Dirt easily blocks these tiny signals. Clean all band switches.
Disconnected or Broken Wires
Disconnected wires are often another trouble source. Battery, headphone jack and speaker wires are all common issues. They can be ripped off of the circuit board when we replace batteries, take the radio apart for cleaning or repair, and so forth.
Sometimes we intentionally disconnect wires in the disassembly and repair process. Always, always take pictures and make notes if you disconnect wires for any reason!
Reconnecting these mystery wires can be easy or a nightmare. Occasionally it’s obvious where a wire belongs, other times not so much.
If you have access to the set’s schematic and other service documentation, and know how to use it you can quickly set things right. If you have a similar radio you can also refer to it for guidance.
Failing Electrolytic Capacitors
Electrolytic capacitors are another weak link, especially now that collectible sets are decades old. The parts dry out over time and eventually stop passing signals altogether.
Sometimes simply powering-up a transistor radio for a half-hour or so will give the capacitors time to re-form, and the set might start playing again. If this fails you will need to recap (replace the parts), a process described here.
Cold Solder Joints
Transistor radios contain hundreds of solder joints where the component wires meet the circuit board traces, battery contacts, switch terminals and so forth. Proper solder joints will last virtually forever. Occasionally joints were improperly made, or damaged during later repair jobs. Cold joints cause intermittent issues, or can make a set inoperable. Often simply reheating a cold joint will resolve the issue.
Proper joints are smooth and shiny. They are good mechanical and electrical connections. Cold joints are dull, clumpy and might sometimes let you wiggle the wires or components.
Refresh your soldering skills here.
IF Adjustment Errors
For some reason, many collectors think that adjusting the little ferrite cores in transformers will improve a radio’s performance. That’s true in a very limited number of cases, and only when done by someone knowledgeable. Fiddling with these adjustments affects the radio’s alignment. Generally, it’s a bad idea, and can make a set inoperable.
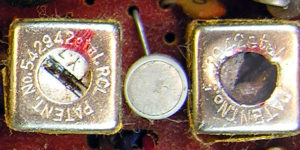 You might be able to realign the set if the coils have not been damaged, (like the right-hand slug in the photo). You will learn how to align AM sets later in this book. Avoid the temptation to just screw with these things in and out; and consider not purchasing radios that look like they have been abused this way.
Damaged Circuit Boards
 Circuit boards contain traces, which are electrical conduits for power and signals. These are actually replacements for wires, and without them, transistor radios would be bigger, messier, more expensive and less reliable.
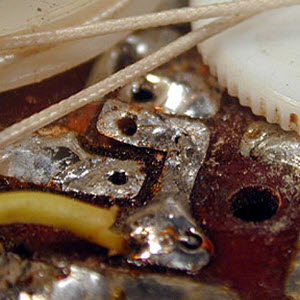
Occasionally the boards get cracked, and/or the traces get damaged. That nasty photo shows a good example of this.
What Do You Think?
Do you have tips and experiences to share? Questions? Suggested corrections or additions? Leave a comment below. I’ll review comments and post or incorporate the most useful ones. Your email address is required if you choose to comment, but it will not be shared.
Thank you, acquired a GE transistor radio and this was a great tool to have a guide as I explored.
I have a fm/am/sw radio with removable R20 batteries. After 8 months, the sound has reduced drastically, I replaced batteries, but the sound is still low. Any solution to resolve this issue?
your suggestions worked beautifully, thank you.