 A lot of us like imagining and then building gadgets. Most electronic devices from the fifties, sixties and early seventies were almost always analog. They were easy to design and repair. Parts layouts weren't that critical.
The thorniest noise problem you encountered was usually a screaming kid in the next room. Simpler times, for sure. Here are some ways to get some of that joy again.
External Test Speaker
This is the most useful home-brew item on my bench some days. It simply replaces a dead radio's internal speaker and also provides test points for measuring alignment progress.
Without opening the radio you can see if its only problem is a dirty earphone jack bypass.
Mine has two plugs, one mono 3.5mm one found on most early portable devices and a smaller

one for the micro sets. There are alligator clips too for inside work. You can take it a step further, if you like by creating something like this Popular Electronics inspiration.
It has an analog meter so that you can watch alignment progress. The variable resistor lets you adjust the meter's sensitivity.
I would personally add a SPDT speaker switch that chose between the speaker and an 8-ohm 1 Watt "load" resistor. Then you and the family won't need to listen to the test tone while you work.
Bench Power Supply Quick Connects
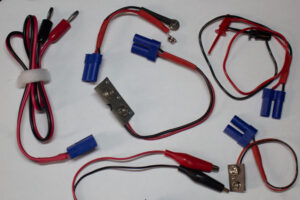 Here's an easy way to power your devices under test from a bench supply without the risks and annoyances of alligator clips. Create a universal connector of some sort for the power supply side, and then a variety of mating adapters. I've made one with small 9-volt clips, another with the large ones used for older Eveready 266 batteries, and so on.
I once made a set of AA-sized tubes that fit into the first and last battery positions of Royal 500 Series radios. Can't even find one of those or a photo of that anywhere. (I tried to sell a bunch with no takers. Let me know if I should try again.)
Signal Injector
You have read about signal injectors elsewhere on this site, I hope. Injectors are the best-ever quick and dirty signal sources for tracking down problems. Below is a schematic and my take on a very early injector design. Unless you have a ton of them, don't waste a CK722 on this. Many other PNP germaniums should suffice.
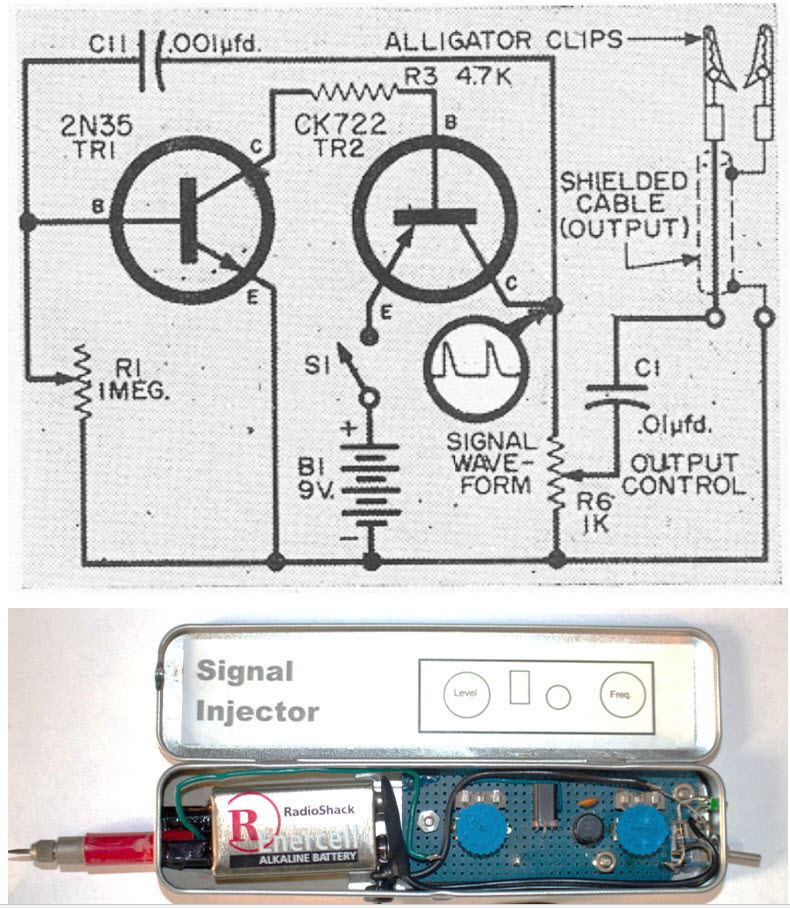
When you need to test stages of an ill behaved radio, connect the injector's ground to the radio's ground and press the inector's probe to the inputs of the radio's variou stages - the center volume control pad, each IF input ans so on. Work all the way back until the signal stops or weakens. Investigate that stage.
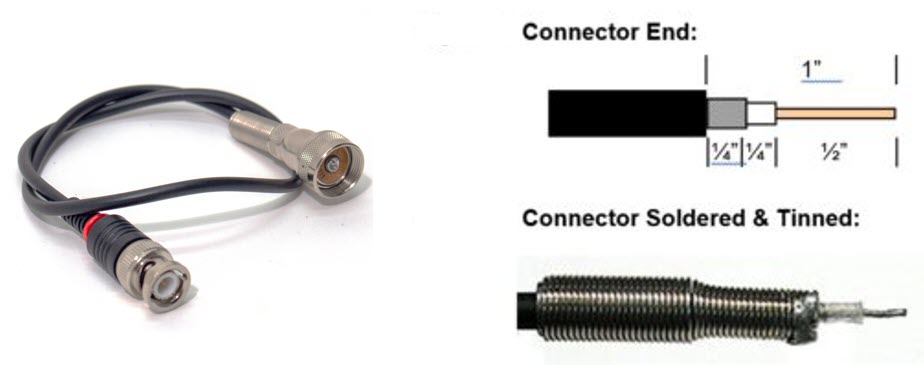
Vintage-to-Contemporary Cable Adapters.
Okay. You have an old timey Heathkit sig gen and a newfangled frequency counter. How do you get the signal from that old, Amphenol-style connector on the generator into the counter--or into the radio, for that matter? You will either need to make or buy cables or adapters. I sell a variety HERE. You will also find NOS Amphenol/Switchcraft style connectors there too.
If you decide to make your own cables or adapters, here is the recipe for stripping coax to fit the Amphenol end of your project:
Workbench Patch Panel
How many times have you had to switch gears? You are working on a pocket radio and a friend or relative brings over an emergency cassette deck repair? You make room, rustle up some speakers and a stereo amp to power them. And the cables. Where are those cables?

These all too frequent, but fun interruptions have caused me to set up an over-the-bench patch panel where I can quickly get line level audio from that broken gear; or phono level audio from my latest turntable project into a reliable little amplifier. It has some nice Warfdale bookshelf speakers attached. There is an Amazon Echo which is my source for everyday Pandora tunes.
The amp's inputs and outputs are right up front. No reaching around back and hoping for the best. I can use the amplifier to test speaker projects that find their way to my bench. I don't need to risk blowing up the Warfdales with an amp rehab project. There are little Radio Shack speakers on either side of the patch panel that I can quickly patch to for that.
I've added connections for access to the Internet router, a real earth ground and longwire antenna. There is HDMI video video routing available to and from my laptop as well. There's another HDMI connection point for the display at my bench and the laptop. Sometimes I use it to display PDFs of schematics. Other times I connect it to an old ROKU box that serves as either a test video source, or the purveyor of depressing cable news. a You get the idea, make it yours.
Speaker Substitution Load


When taking measurements and making adjustments to vintage audio amplifiers things can get pretty loud. And simply disconnecting the speaker is a bad idea, particularly on early solid state amps. This speaker substitution load is a nice workaround. The one in the photo has two 100W, wire-wound eight-ohm resistors in it. You can obviously make variations to suit your projects.
Capacitor Substitution Jumper
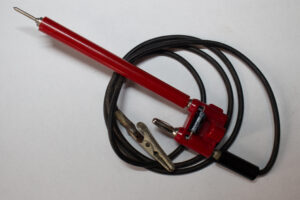 I usually just swap out every electrolytic capacitor if I open up a 50s - 70s radio. I sell nearly 500 kits designed to help you do just that. If you like to pick and choose which capacitors you replace, here's a life saver. You connect the alligator clip to the common point on the radio and place the test lead on the suspect capacitors other terminal. If the cap is bad, you will likely hear an improvement.
 If you look closely you will see that the cap straddles two banana connectors. The probe can be slipped onto either one, so if you are working on a negative ground set you slip the pointer onto the positive side of the substitute cap. Positive ground? Do the reverse.
NOTE: Some caps, like the ones often found between the detector and volume control don't want to be grounded. Use the probe on one side of the suspect cap and touch the alligator clip to the other trace. Bam!
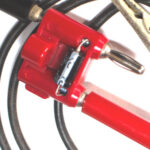
Bias Resistor Bridge
You can do the exact same thing with a variable resistor to fiddle with transistor bias. Connect a potentiometer in place of the capacitor above and experiment with changing bias settings. 'Best if you know what you are doing. If not, practice on a junker. You can learn this!
Dim Bulb Current Limiter for Tube Gear Powerup
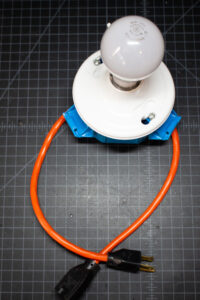
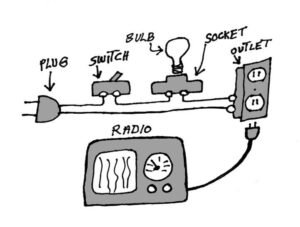
Old tube sets have a habit of smoking, or even bursting into flames when first powered-up after a decade or two nap. It's the electrolytic capacitors. They need to be "reformed". The best way to do this is with a variable transformer that you use to slowly increase the voltage going to the vintage set.
But we are all impatient now. 'Come on. Come on! So, a quick, easy and affordable alternative is to place your tube buddy in series with a 100W incandescent bulb. This will usually reduce the need to find the fire extinguisher or dial 911. Use caution. Your Mileage may vary. There's more to know. A great source is antiqueradio.org. That's where this sketch came from.